Deploy Control App to the Robot!
Now that your control application performs well enough, it’s time to move on to the final stage of the hackathon: Have the robot run autonomously and measure the time it takes to accomplish the mission laid out in the final challenge!
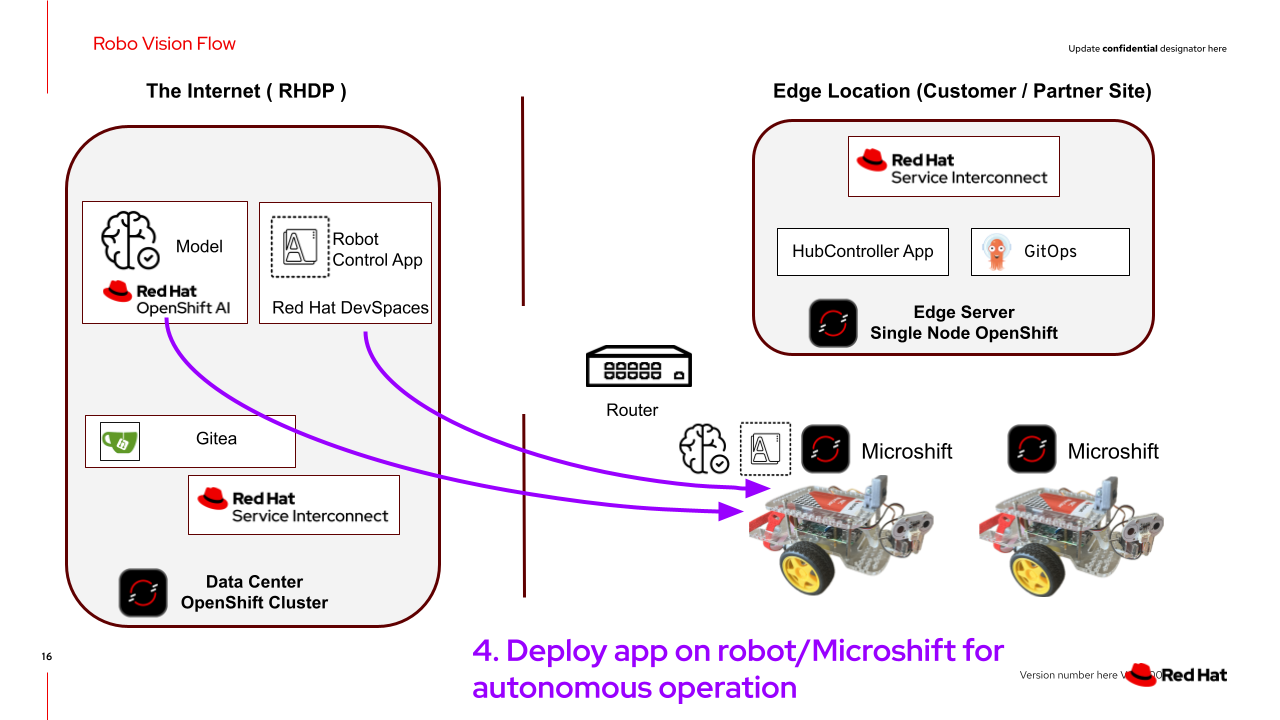
Testing our solution from OpenShift DevSpaces is fun, but what we really want is an autonomous robot that can think for itself and find our fedora in the most disconnected of places. This means the controll app and the object detection service have to run locally on the robot.
You will have to provide your solution assets in the form of container images. It is time to package them and deploy them onto the robot itself.
Build a Container Image of the Object Detection Model
Once we are finished with tuning our object detection model, we will package it into a container image to be deployed on the robot.
The pipeline will use the model model/model-latest.onnx in your S3 bucket for the build. So if you have switched from your custom model (model-latest.onnx) to our pretrained model (model-custom-images.onnx) you will need to go to the S3 Browser Workbench, download backup/model-custom-images.onnx and upload and replace model/model-latest.onnx.
|
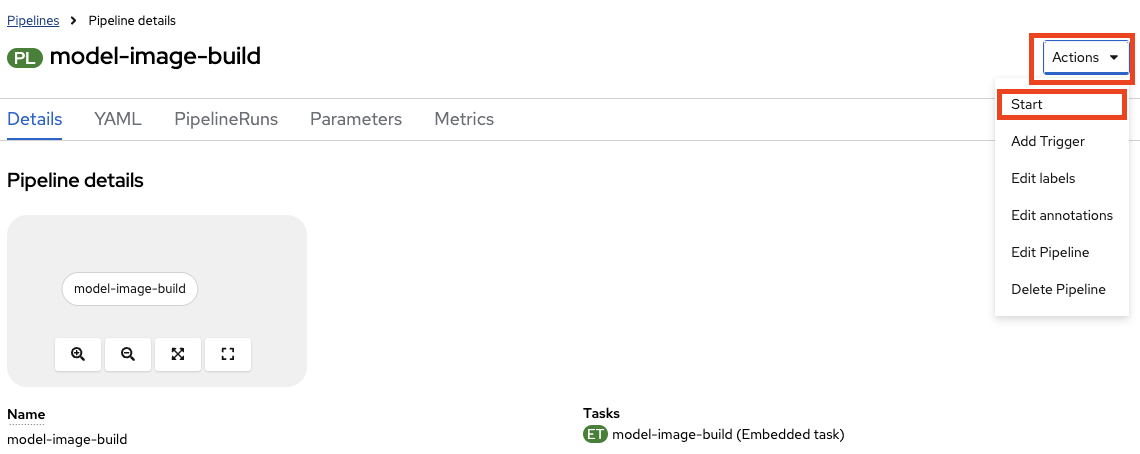
An OpenShift pipeline based on Tekton has been prepared for you
-
If not already, login to the OpenShift Console via SSO with username: team-1 and password: secret-password
-
Go to the the project team-1-ai
-
Click Pipelines on the left
-
Click on the Pipeline
model-image-build -
Click on Actions → Start
-
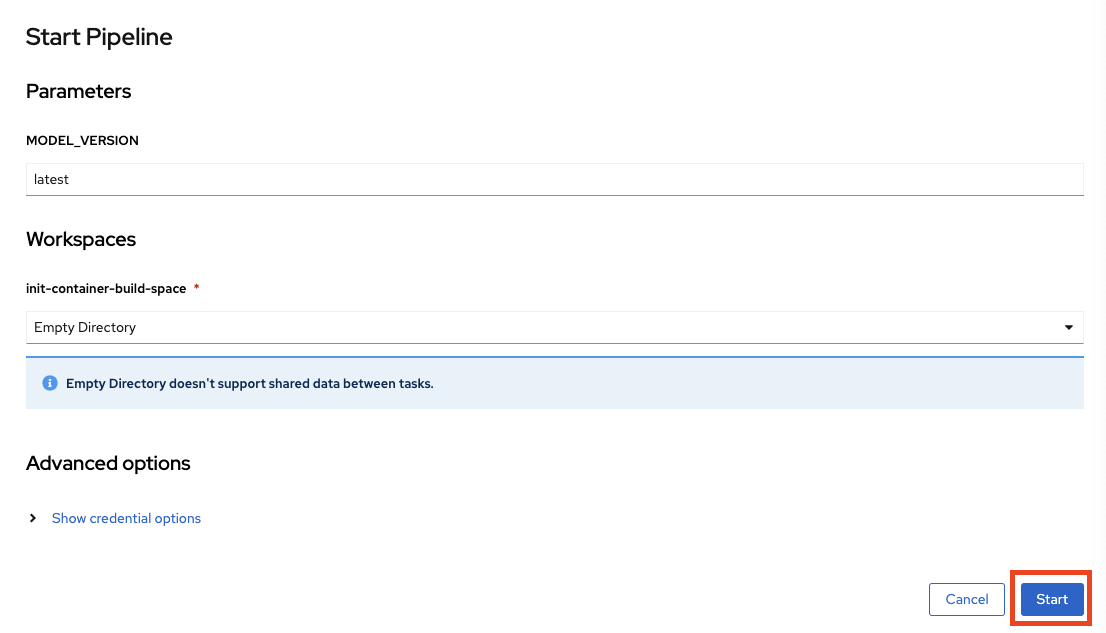
Click on Start to start the pipeline
Build a Container Image of the Application
When you feel done with the app, it’s time to package it in a Container Image as well.
| Make sure you have pushed the latest version of your app into Gitea! |
A matching pipeline has been added to your template app repository. This pipeline is triggered by the creation of a Tag in Gitea. Once you are ready, all you need to do is create a Tag and the Pipeline will build and push the Image to the local OpenShift Registry. Magical!
-
Login into Gitea with
-
username:
team-1 -
password :
secret-password
-
-
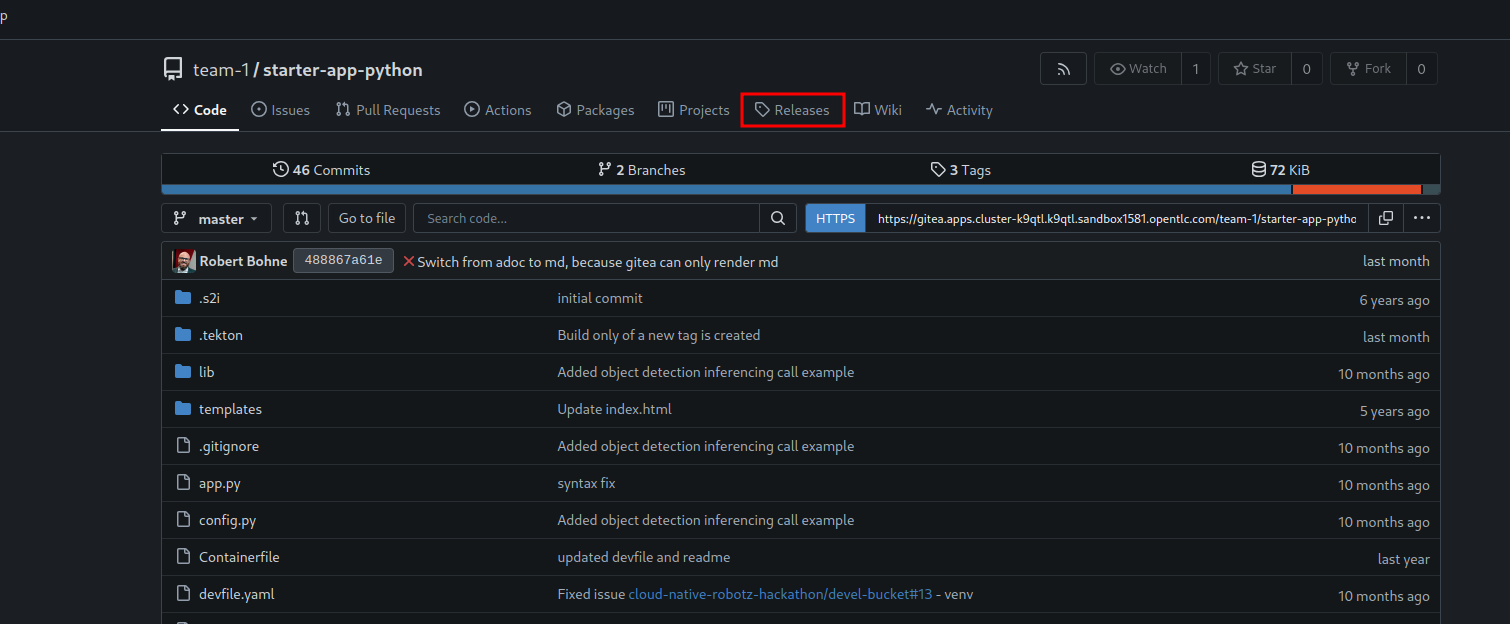
Select the repository
starter-app-python -
Click on Releases
-
Click on New Release
-
Enter the Tag name:
v1 -
Click on the button Create Tag Only
Please open OpenShift Console. You should see you Pipeline running.
If not please, follow:
-
Make sure you are in the Project
team-1-dev -
Click in the Menu in the left: Pipelines → Pipelines
-
And the Tab PipelineRuns
-
Deploy your Images to the Robot with GitOps
Now that we have the images, we can deploy them to the robot. Since the robots are running Microshift (a lightweight version of OpenShift) we can use consistent tooling to automate our Deployment. We will use OpenShift GitOps based on ArgoCD for this.
A OpenShift GitOps project has already been setup that listens to changes of a configuration repository. The microshift of your robot as been added as manged cluster so any change in the repo will be rolled out diretcly to your robot. All you need to do is update the configuration code in Gitea.
Have a look at the Git repo : robot-gitops
-
The object detection image needs to be set here:
-
robot-gitops/src/branch/main/base/namespace/triton/deployment.yaml
-
Click on the pen icon on the top right to edit the file
-
In the resource yaml look for the field
image:with the valuequay.io/cloud-native-robotz-hackathon/model-container:trained -
Replace the value with
default-route-openshift-image-registry.apps.example.com/team-1-ai/model-container:latest -
Click on the Commit Changes Button at the very bottom
-
-
-
The app image needs to be set here:
-
robot-gitops/src/branch/main/base/namespace/robot-app/deployment.yaml
-
Click on the pen icon on the top right to edit the file
-
In the resource yaml look for the field
imagewith the valuequay.io/cloud-native-robotz-hackathon/starter-app-python:master -
Replace the value with
default-route-openshift-image-registry.apps.example.com/team-1-dev/starter-app-python:v1 -
Click on the Commit Changes Button at the very bottom
-
-
| In real world projects, you would use a tool such as Kustomize to add modification layer without changing the actual deployment.yaml files |
Once you commit the changes OpenShift GitOps will start to work on the deployment.
Check OpenShift GitOps / ArgoCD rollout
Login into OpenShift GitOps / ArgoCD:
-
Open: OpenShift GitOps/ArgoCD
-
Click "LOG IN VIA OPENSHIFT"

-
Click Allow selected permissions
-
Now you can follow the rollout, this is the entry view:

If you click the tile, you’ll get a detailed view of your GitOps rollout:
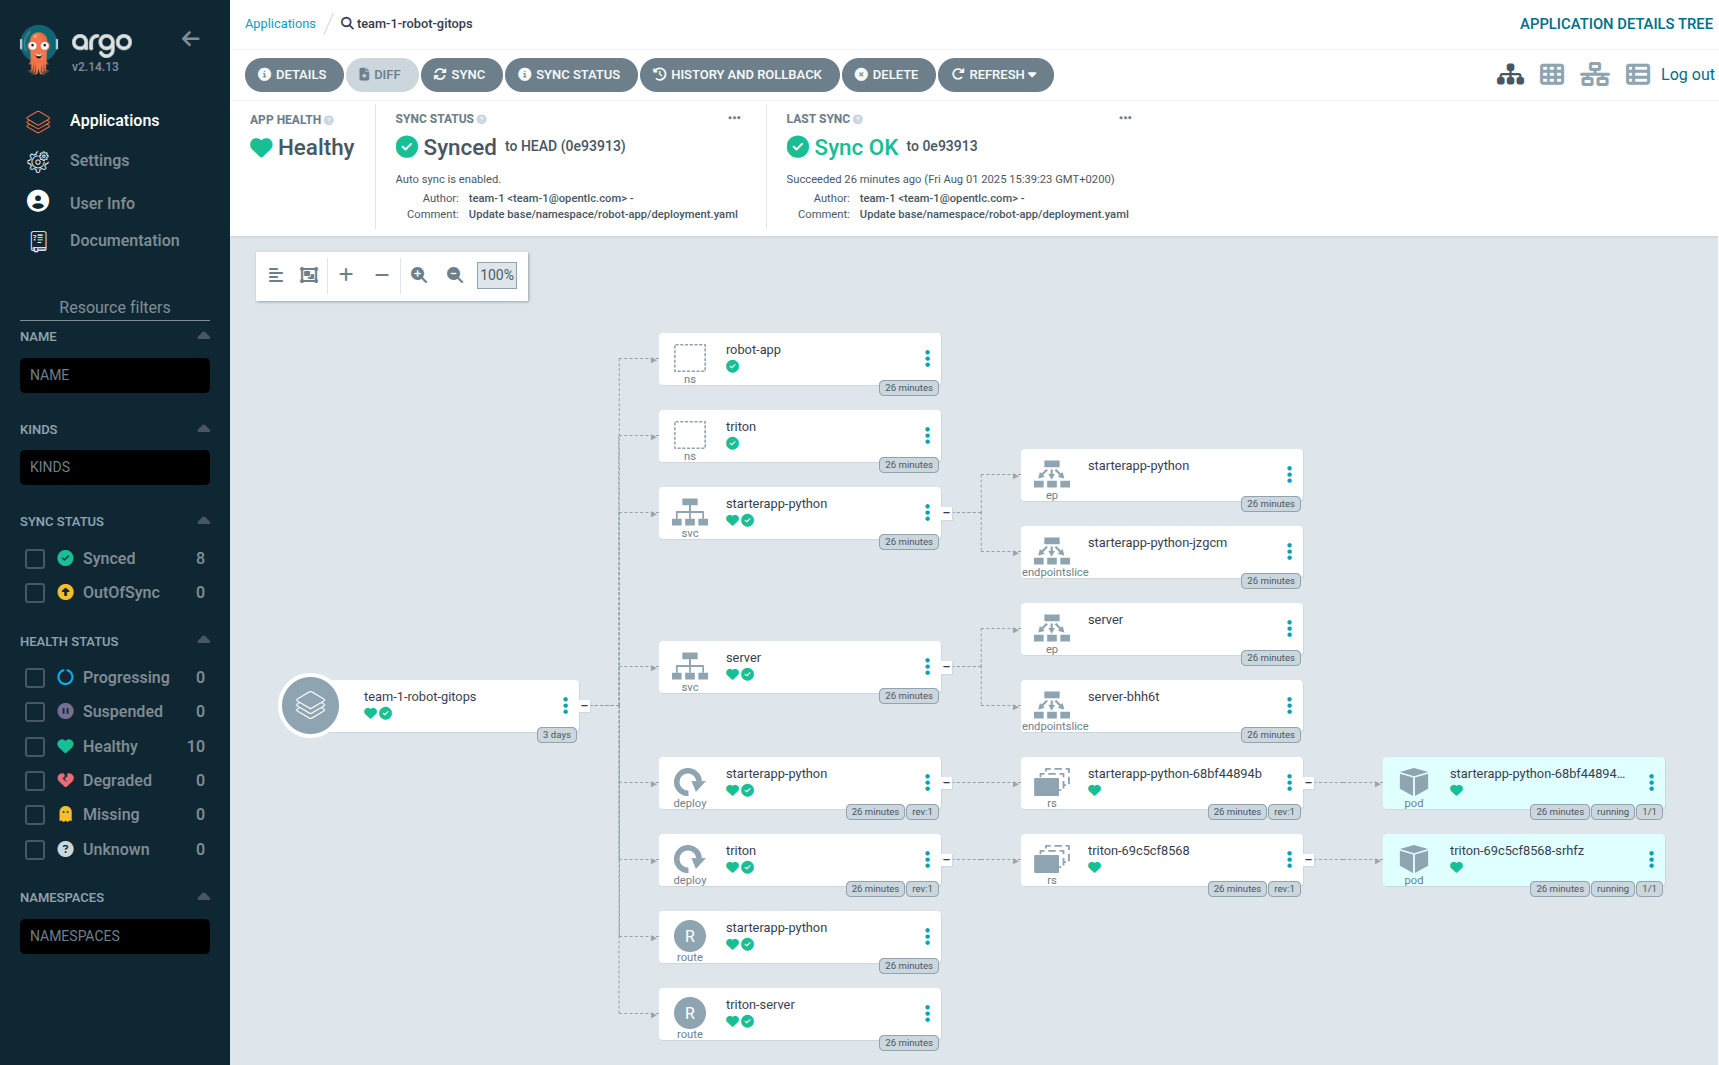
But the outcome is clear: The control application and the image detection model are running as containers locally on your robot, enabling autonomous robot operations.
Start the Robot
As the app is now running locally on the robot, you won’t get access to the web UI of the app. It’s an edge device after all… ;-)
But we need a way to call Initiate Run and Emergency Stop like you did before from the web UI. Here good old curl comes to the rescue.
To start the robot, go to your Dev Spaces VSCode session and open a terminal. In the terminal execute the following command to initiate a run:
curl -X POST \
-H "Host: starterapp-python-robot-app.apps.gort" \
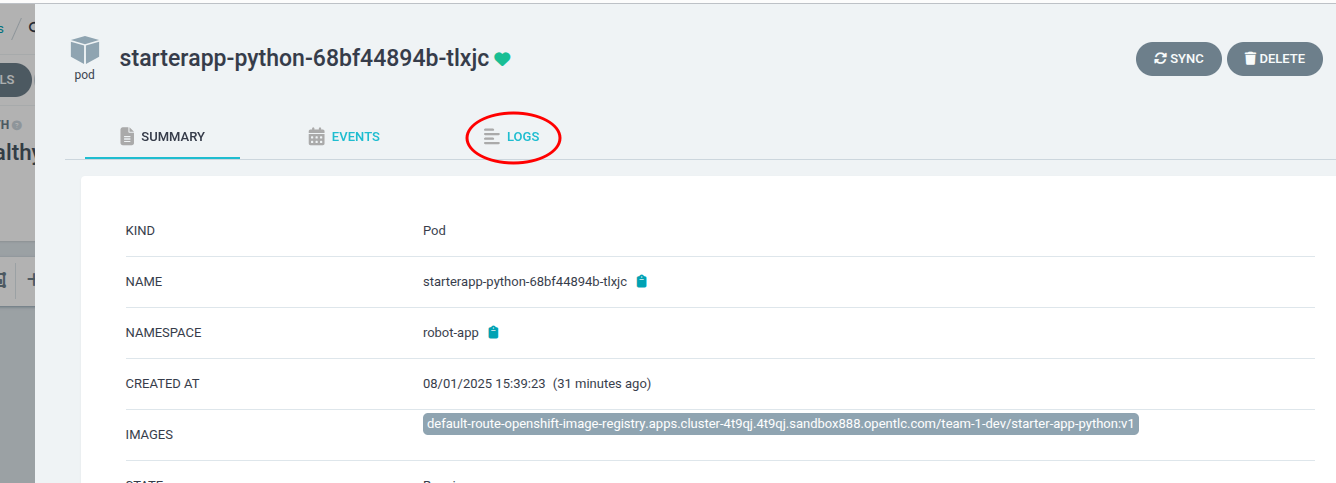
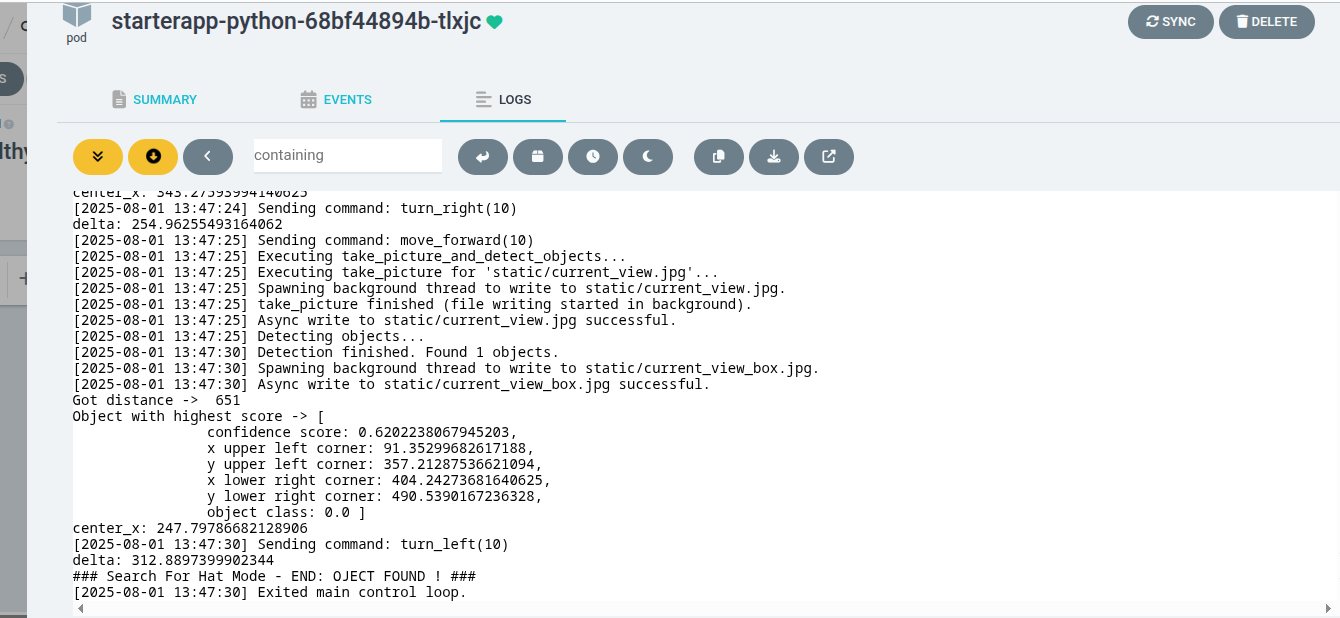
http://gort.robot.svc.cluster.local:80/runYour robot should now execute your code and start moving. If you want to check the output of your control app, you can do this in OpenShift GitOps. Go to your ArgoCD UI again and click the box representing your app (starterapp-python-….) to the left. In the next view choose the LOGS tab:
After a short delay the output of your app will show up in the window, same as what you are used to from developing the app in Dev Spaces:
To stop your robot you can call the stop endpoint in the same way as you just run it:
curl -X POST \
    -H "Host: starterapp-python-robot-app.apps.gort" \
    http://gort.robot.svc.cluster.local:80/stop
Expected outcome of this chapter
After this chapter:
-
You have used GitOps to deploy your containerized app and AI model to the robot Microshift
-
Your robot is now able to run as an autonomous edge device, while being easily updatable with new versions of your app and model
That’s it, you have succesfully run a full DevOps and MLOps Deployment Lifecyle all the way to the Edge using OpenShift and Kubernetes paradigms.